Wednesday, January 21, 2015

Vintage Finds

Joanna told me about a gold mine of free sewing materials in my neighborhood.  The owner was cleaning up her garage and reserved a bin of goodies for me.  I have nothing vintage in my house (things that are worn or need to be discarded do not mean vintage).  When I opened the bin, I thought of the word "inheritance."  It gave me goosebumps that I was about to peek into another's life.
There were a few pieces of strawberry napkins.  Cute!  

Lovely laces.

Spools of colorful thread (will find out if they are "too vintage" to use).

I had no idea what this thingamajig was.  The lady just stuffed it in the bin and said "why not."
I am so thankful that at this day and age, I could find instructions for ANYTHING online. Click here for the link.  Guess I will be playing with rhinestones pretty soon.

 Then came THIS.
It opens up to reveal several compartments.  I immediately thought, "hey, great for cupcakes!"  (sorry, it was lunch time and I was overdue for a meal.)  Then, again, it might be best for jewelry storage on a nightstand.  LOVE the cherry embroidery.

Loads of buttons!  

 La Mode buttons are still easy to find now a days.  They run anywhere from $1.60 to $7 per package.  Look at the price back then!  60 cents! BTW, isn't it cute that this lady used the back of the package to jot down measurements, notes or calculation (the numbers did not add up though)?

 While the buttons now are almost always made in China with no description in the back, these buttons were mostly made in Japan, with "Guaranteed washable" printed in the back.

 I don't see Sears buttons anymore.  Not to mention for just 49 cents.  The others were 29 cents.  Again, guarantee to be washable!
Guess there used to be a Vallco Drug that sold discounted Chic buttons for 12 cents a package.

Lastly, a few yard of Italian waist band elastic (the wrapping board was a piece of wood, not cardboard) and washing instructions (with extra button and yarn) for a sweater.
I promised the lady that I would send her a picture of how I utilize these sewing materials.  Thank you, for passing down a piece of your life to me.
deb signature Follow TingTingMamMa

Thursday, January 15, 2015

Tutorial: Easy Zipper Yarn Dispenser Bag


It all began with one multi-colored shower curtain.  From the same curtain, I've made a tripod bag, a trash bag for the car and a back support pillow.  I love the vibrant colors, the stripes, the heavier weight fabric and the grommets.
I wanted to utilize the grommets and thought a yarn dispenser bag would do just that. 
Here's how I made the zipper yarn dispenser bag:
Cut a piece of fabric measuring 11" x 26".
(I have folded the curtain lengthwise, thus it appears to be 11" x 13" in the picture.)
Be sure to put into consideration the grommet placement and that the grommets should be on one of the shorter ends.
*Since the grommet end is already finished, you will be attaching the zipper and top stitching with just one step!
Mark the center of the zipper (13" long) and the shorter ends of fabric.  With the zipper right side up, lay the fabric (grommet end, right side up) on the zipper, and match center marks.
Pin, pin, pin. 
Change your sewing foot to a zipper foot and stitch.
 Now, attaching the other side of the zipper with right side of the zipper and right side of fabric facing.  Match center marks, pin and stitch.
Turn the fabric right side out.  Top stitch.
 *OPEN the zipper! (so you could turn the bag right side out with you are done sewing.)
 Turn the fabric wrong side out.  Leave 1 1/2" on top of the zipper, pin and stitch both open ends close.  (stitch over the zipper back and forth a few times) Clip the excess zipper ends.
With the seam facing up, pull one the bottom corners to create a point.
Measure 1 1/2" from the point and mark sewing line with water soluble pen.
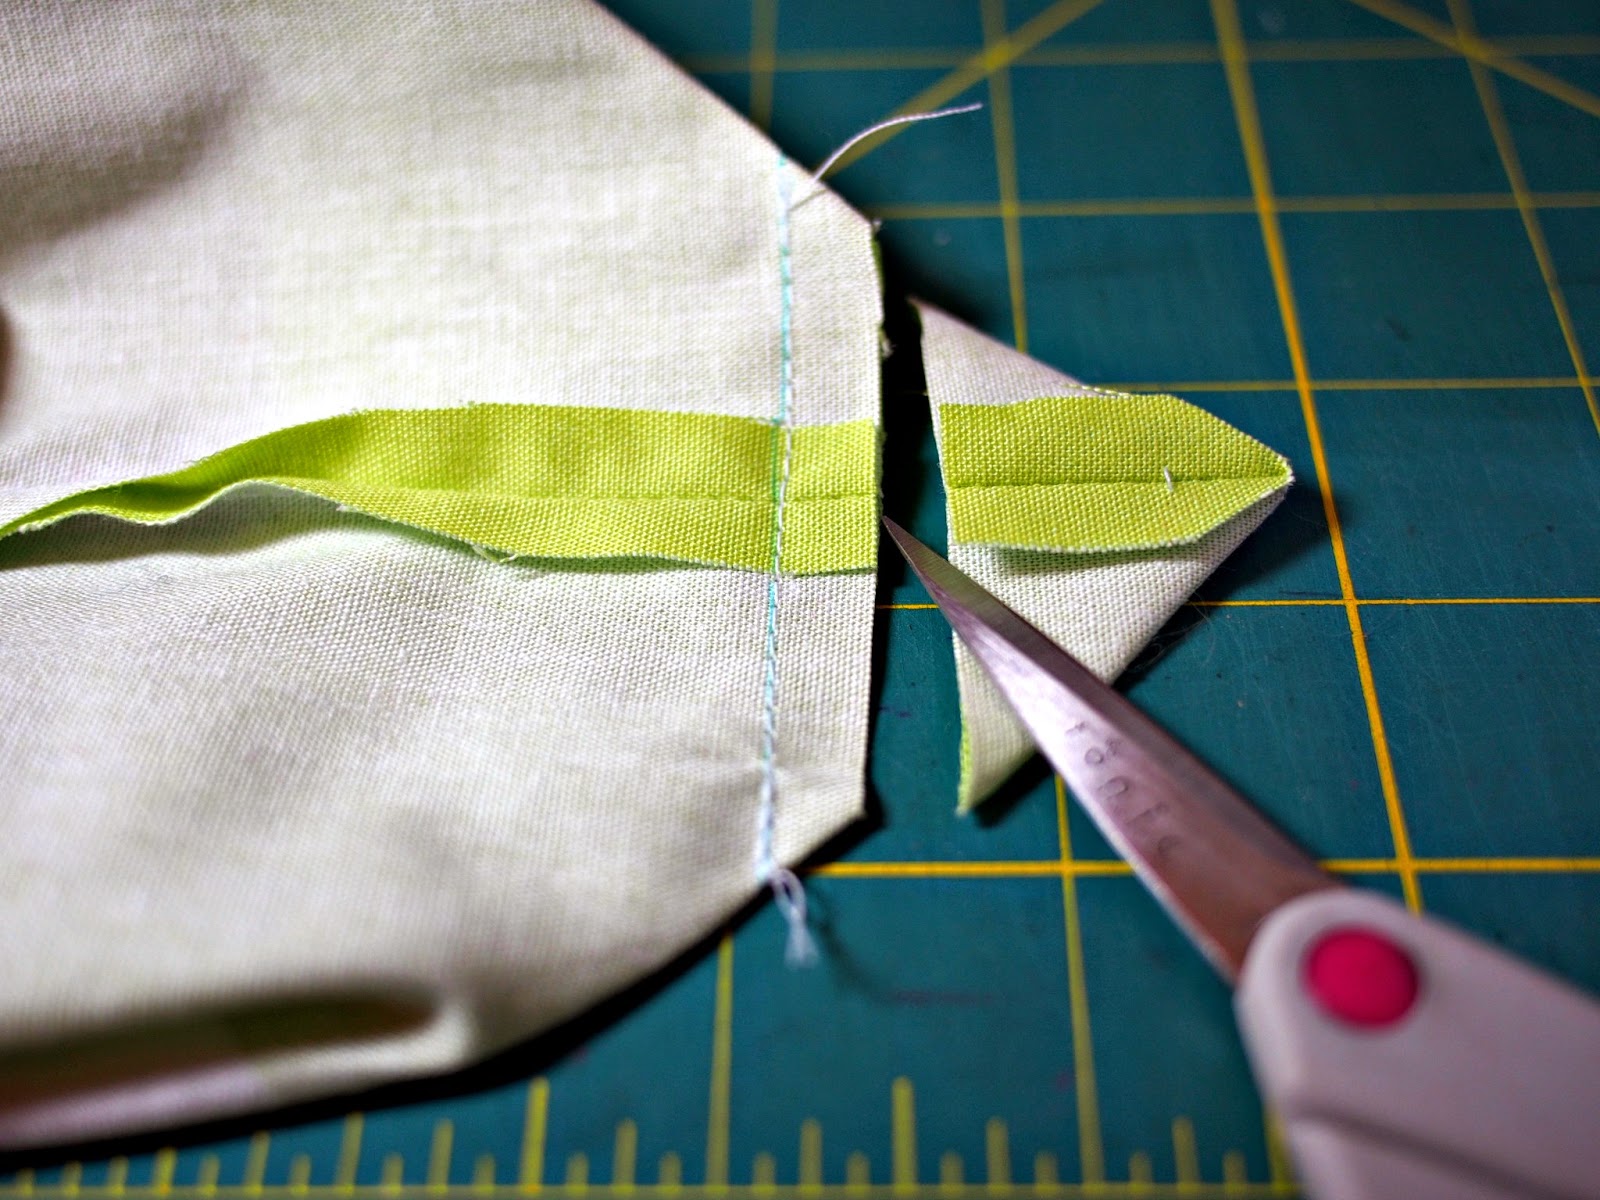
Stitch.  Clip 1/4" from stitched line.  Repeat on the other corner.
You could clip the raw edges with pinking shears.  Or...
 Bind it with bias tape.
Cut single fold bias tape 1/2" to 3/4" longer than the raw edge.
Unfold the bias tape lengthwise.  With wrong side facing up, lay bias tape along the raw edge.  Fold in the 2 short ends of bias to match the length of raw edge. Pin.
 Stitch right on the fold closest to the edge.  Then, fold the bias tape to the other side.  Fold in the 2nd fold to sandwich the raw edge and pin.
 Select a short zig zag stitch on your machine.
Stitch.  Turn the bag right side out.
 Put your ball/skein of yarn in the bag and thread the yarn through the grommet.  I am now ready to knit my next project!

deb signature Follow TingTingMamMa

Thursday, January 8, 2015

Back Support Pillow

I've had back problems as early as senior year in college.  My physical therapist at the time told me to put a roll of small towel under the arch of my back whenever I sit or sleep.  I've been diligently following her instruction ever since (not because of discipline, but because of need).
But the problem with a towel roll is...well, you guessed it, it unrolls.
I had to be creative.  My solution in college was to use one of my penguin stuffed animals instead.  I really wish I had a picture to post.  I donated the penguins, but my back ache remained.
I found a small pillow in place of the penguins.  After years of daily use, it got pretty sad.
Then I knew.  It's time to sew!!
This pillow was made from a curtain I bought a few years back.  I measured and cut 2 pieces of 13"x8" from the curtain, added a thin pipping and stuffed it silly.
This pillow will be sitting in the car for a long while.  It also goes well with the trash bag I made in September.
deb signature          Follow TingTingMamMa

LinkWithin

Related Posts Plugin for WordPress, Blogger...
Follow TingTingMamMa