Thursday, July 27, 2023

The Efficiency of A Serger

For years, I looked for a serger, but I never had enough courage to buy one.  I was unsure, for starters, if I could handle the learning curve.  In addition, I dislike the sergers' price tags.  😅  I only recently began sewing knit/jersey, and I quickly realized that a serger would truly spare me from the unprofessional finishing and the hassle of dealing with knit fabric.  
The other day, I went to eBay to browse.  I decided to test the auction after spotting this baby lock Lauren up for auction, which would end in ten minutes.  "If someone outbid me, it was not meant to be," I assured myself as I set my budget. 🤞  Ultimately I outbid other bidders by just $1. 😳  I stumbled across this serger at an unbelievable deal that I couldn't believe.   
The serger arrived in pristine shape.  😍. The only disadvantage was the musty odor that lingered.  This serger was probably once owned by a crafty lady who no longer has the time or energy to sew or serge.  In my heart, I thanked her for passing her serger to me and promised to take good care of it and put it to good use. 🙏
My initial course of action was to eliminate the odor.  Febreze, in my experience, does wonders.  I lightly sprayed the box and the threads, avoiding the metal parts, and hoped for the best.  It took about two days for me to be able to get to the serger without wrinkling my nose.   
Threading the machine proved to be tricky but not impossible.  I got the hang of it after a few tries, thankfully.  I have yet to try gathering and hemming.  But I am content for now.
Because lint and dust are particularly prevalent adversaries of sewing machines and sergers, my first serger project was to create a cover.  I wanted it to be a quick project, but I still wanted a cover with some structure. So I went with a 24"x30" double-sided quilted pink fabric scrap.   It was bit shorter than desired, but I compensated by sewing 2 pieces 24"x4" of pink plaid flannel fabric to each sides, adding additional texture at the same time.  Putting this cover together was a breeze with the serger.  The cover was done within 20 minutes! 
Of course, as usually, I couldn't help but add a personal touch.  
And here it is.  
Believe it or not, it took me far longer to cut and attach the letters than it did to use the serger.  😂
Now I'll go on to my next endeavor. 

deb signature Follow TingTingMamMa

Friday, November 11, 2016

Simple Greeting Card

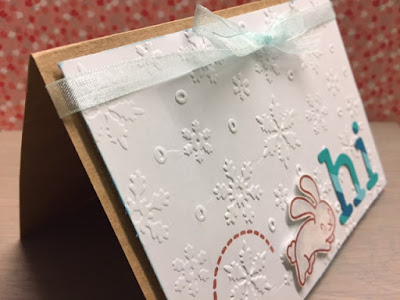
I love this white snow flake embossed paper!  I thought some blue/green accent will go well with it.  This time, I wanted to practice the stripe inlay technique for my "hi" die cuts.  I wish my stripes were skinnier, but it turned out fine.  This card is for one of my favorite teachers.  I wanted her to know that I am thinking of her this time of the year.  I hope this card will bring her joy.

Follow TingTingMamMa

Sunday, November 6, 2016

Thanks To You Cards

These two cards are very similar.  The 1st card feels like spring/summer time.  The 2nd one is more like late autumn/early winter.  The 2nd card has a dyed card base with matching "to you" (though the color for the embossing power for "THANKS!!" was not a great choice).
Follow TingTingMamMa

Friday, November 4, 2016

Birthday Card

Yup, this card looks just like the Thank You card I made not long ago.  Instead of holding a present, the fox is now holding a cake and saying "happy birthday".  
Follow TingTingMamMa

Sunday, October 30, 2016

Thank You Card

One more thank you card done!  JJ suggested to place the fox slightly at an angle.  So if you find yourself tilting your head while looking at those pictures, you now know why.
This card was made for JJ's dear friend, M, whom she's not seen for 4 long months.
deb signature Follow TingTingMamMa

Saturday, October 29, 2016

1st (Birthday) Shaker Card

JJ and I have always wanted to try making a shaker card.  But the thought of the project sounded daunting.  The heart embossed paper and the large die cuts were my muse.  And I decided to give it a go.  I turned the ornament upside down to use it as a huge balloon. I do not have tiny sequences.  So I rummaged through my drawer and found a bag of bugle beads.  Just the right size and color for the window.  It's more manageable than I thought and it's so fun to make!  My favorite part is having the reindeer holding the string of the balloon (though gluing the string was a pain). The only thing I will do differently if I make this card again is to change the white circle backing to the balloon to another color.   


Follow TingTingMamMa

Thursday, October 27, 2016

New Life to the Keyboard Tray

I have recently "inherited" my hubby's old desk as my new crafting/sewing table.  Before this, I was using a folding table for all my activities.  So, this is definitely an upgrade.  Remember the days when you have to attach a keyboard tray under your desk?  Well, this desk is old enough to have one.
I thought about removing the tray, but wanted to see if I can use it to store my supplies.  Guess what, this tray can hold a lot!  My sewing feet, bobbins, pins, needles now sit happily in this shallow tray.  If you have an old desk like me, check quickly!  You might be one of the lucky ones to utilize an old tool in new ways.
deb signature Follow TingTingMamMa

Sunday, October 23, 2016

Color Chart for Color Pencils

Coloring with Copic markers, water color brush pens or color pencils has been quite popular.  I've seen crafters keeping a color chart for their tools.  I've never thought it was necessary until I tried making one for my color pencils.  I have taped the color chart to the inside of the tin lid of my color pencil set for quick reference.  When I fill in the colors, I could for the first time compare the colors of those pencils side by side.  For the browns, especially, I could see which ones have more red than others, which I was not able to do just looking at the wooden body of the pencils. This has helped me in layering and blending colors.  
deb signature Follow TingTingMamMa

Wednesday, October 5, 2016

Pencil Pouches

I made this one for JJ.  It's baggier than I wanted.  But it turns out that JJ's teacher this year is asking the students to bring many pens, color pencils and different markers to school.  So this is perfect!

I made another one for my sweet young friend.  This one is seriously much neater and a better size than the one for JJ.
deb signature Follow TingTingMamMa

Yellow Pocket Pouch

I made this for my dear friend's birthday back in May.  Now that she's moved, I do not see her everyday as I used to.  I miss her so much.  I am thankful to have her friendship for the past years.

KeyKa Lou Pattern.
deb signature Follow TingTingMamMa

Wednesday, September 28, 2016

Thank You Cards

JJ and I have had so much fun making cards lately.  We've watched many Youtube clips before trying some on our own.  Since the theme for the past Summer's VBS was Deep Sea, I can't seem to have enough of the sea creatures.  And it reflects on the choice of die cuts on my cards.
The most useful cards we have made so far are the thank you cards.  And we have so many people to thank, from my VBS leaders team, the decorating helpers, my student who brought me something from her trip, to my own kiddos.   I guess I am trying to justify my time spent on crafting as always.  Haha.


deb signature Follow TingTingMamMa

Friday, June 24, 2016

Video Tutorial: Personalized Bookmark Cards

This is my first attempt to compose a video tutorial. My teen boy who's tech savvy offered me tips.  Thanks, son.  I am not  pleased with the speed or the resolution, however.  I am sure I still have tons to learn regarding putting together a video.  So bear with me.  
For this project, I used die cut letters, partial die cut, and watercolor pencils. 
(Update: I just realized that this clip is not smartphone friendly.  Sorry.  
Time to talk to my son and find a fix.)
(Update 2: Issue resolved.  Yay!!)
deb signature Follow TingTingMamMa

Saturday, April 16, 2016

Dinning Chair Re-upholstery

 My dinning chairs are celebrating their 10th birthday.  I loved how easy it was to clean the white vinyl seats until they got stained so badly over the years.  The picture above actually shows a chair that is still in decent shape.  Most of the seats have been punctured and slashed by my cat who loves to jump on them.
There are many re-upholstery tutorials out there that seem pretty easy.  And most importantly, I own a staple gun and I've been waiting to try my hand at it for a long while.  This is definitely the project!
Seriously, from taking down the seat cushion, to cutting the fabric, to staple the fabric to the seat, to screwing back the seat cushion, each dinning chair takes me less then 15 minutes.  Easy and fast.  I get my kids to do all the pounding to make sure the staples are flush.  Great Spring break project with the kiddos, I'd say.
4 done.  4 more to go.
deb signature Follow TingTingMamMa

Thursday, February 25, 2016

We Go Together, Like Rama Lamma Lamma Ka Dinga Da Dinga Dong

Guess whose house has been playing Grease over and over and over this past week?
Finally get this set of gift ready.  It's been way overdue.  Anne, my sister, I hope these will brighten up your day!
deb signature Follow TingTingMamMa

LinkWithin

Related Posts Plugin for WordPress, Blogger...
Follow TingTingMamMa