Friday, June 29, 2012

Hosanna!


JJ found this in the garden and decided to call it, the Hosanna leaf.  She’s drying it in her children’s Bible, right next to the story where the crowd laid the palm leaves to welcome Jesus.

deb signature Follow TingTingMamMa

Thursday, June 28, 2012

JJ's Hair Cut

For the past few years, I cut the girls' hair toward the end of June for a couple of reasons:  
1. I do not have time before that.  
2. The weather is warm enough to have the girls sit outdoors.  
3. Based on reason #2, clean up will be easy.  
4. The girls dance.  I need to resist the urge to cut their hair before their recitals.  

This year, not only had F made the Junior Dance Company (so she'd need her long hair all year round), F also decided early on that she'd grow her hair long enough to donate to Locks of Love, the non-profit organization that help children who suffer from long term medical hair loss.  So, I only got to cut JJ's hair.  JJ looks refreshed and ready for grandma's visit.

deb signature Follow TingTingMamMa

Tuesday, June 19, 2012

Tutorial: Plastic Bag Dispenser

Remember these Target kitchen towels from my post JuneGreat Finds a year ago?  I intended to use them to make 2 more messenger bags.  But...
When this quilted fabric bin project came along, I caved in and used a small portion of the kitchen towels.  I ended up not having enough coordinated fabric for a messenger bag and would really like to use up the remnant.  So, when I was working the in kitchen one day and having to bend down to get a plastic bag under the sink, I thought, why not make a plastic bag dispenser?

Here’s how I do it:


 1. Cut your kitchen towel to about 19" long (that's what I have left with from            the last project).  With right side facing, fold the fabric in half width wise.  Sew along the existing stitch line length wise.  Now I have a long tube.
2. Press seam open.  From the wrong side of fabric, fold under 1" at both ends of the tube and press.
3. To create casing for the elastic, stitch all around the folded ends leaving a 2" opening at pressed seam (it's too bulky for the sewing machine to sew through anyway). Repeat on the other end of tube.
4. This is the opening for the elastic casing.
5.  Turn the tube right side out.  Decide which end will be the dispenser "top".  Cut ribbon to 13" long.  Fold 1" under at the ends and pin to the mid points of the sides of the tube just below the casing.
6. Stitch two straight lines to secure the two ribbon ends.
7. Mark elastic @ 5" long with pen.  Use a bodkin to thread the elastic through the casing opening.
8. Pull the elastic tight until you see your pen mark.  Tie a knot.  Snip the excess elastic off.  Sew the opening of the casing closed.  Repeat on the other end of tube.
note: It's easier to cut the elastic after you have tie the knot than to cut the elastic to 5" 1st and struggle with making that tie with limited material.
9. Stuff plastic bags in the dispenser.  Hang it and use it right away!

This tutorial is featured on Made by you Monday over at Skip to my Lou and on The Winthrop Chronicles.

Skip To My Lou

deb signature Follow TingTingMamMa

Saturday, June 16, 2012

JJ's Birthday Treat!

    We celebrated JJ's 5th bday.  Without throwing her a party, we took her to her favorite zoo/park and the children's discovery museum for the day.  I love her joyful smile.  Happy bday, JJ!

Just JJ and mommy
Having a blast at the red pin wall.  JJ made a heart.

Dad knows how to have fun!


JJ's sis is the best companion. 

JJ making clay cookies
deb signature Follow TingTingMamMa

Wednesday, June 13, 2012

Baby's Crinkle Hankie

Our friend Sue is having a baby boy.  JJ was so excited about the coming of this baby, she asked if she could make him something out of fabric.   So I gave her a piece of flannel to work with.  She came back with the flannel cut into a square, saying that it was to be the baby’s hankie.  
So, I helped just a little to finish up this baby hankie.

     
    1. Cut a piece of fabric the same size as the flannel as the   back of the hankie.  

    2.


    3. Sew the plastic to the back piece.  Set aside for now.
 
    4. Pin and baste various folded ribbons (with different textures) to the 4 sides of the flannel piece.
    5. With right side facing, sew the flannel (main) piece to the back piece.  Stitch all the way around, leaving a 2-3" opening for turning.

    6. Turn right side out.  Stitch the opening closed.

deb signature Follow TingTingMamMa

Tuesday, June 12, 2012

Rag Curls for Graduation

My baby graduated this morning!  
For her graduation, F wanted to have curly hair.  So last night, I used about 24 pieces of rags to curl her hair.  Z just dropped his jaw and said, “what are those on your head?”  
When I combed the curls out this morning, F's hair was ridiculously puffy.   Thankfully, after tying the hair with a few rubber bands, it looked fine.
Congratulations, my sweetie.
Middle school, here I come!
deb signature Follow TingTingMamMa

Sunday, June 10, 2012

2nd Year of Geoduck Feast

Our adventurous neighbor is also very generous.  This is the 2nd year that we received their geoduck catch.   Last year, we had a stir fried dish and a sashimi dish. This year, we did 2 ways again with our gifted geoduck, thinly sliced geoduck tampura and stir fry with sugar snap peas. The tampura dish was so good that everyone just dove in before I could take a picture of it. (thus the un-fried dish pictured @ lower right).
A, M, N and T, thank you for this tasty treat!
deb signature Follow TingTingMamMa

Wednesday, June 6, 2012

Tutorial: Crepe Paper Rose Bouquet

Some good ideas started off with a bad one. 
Last year, I was in charge of creating trophies for the ministry award night.  At first, I thought I could perform some DIY magic.  So I purchased 6 foam balls, a few bottles of gold and black paints and got to work.  Well, it was an experiment gone bad.  The trophy looked ridiculously cheap homemade (see picture on the left).  In my last minute desperation, I had to call for professional help (pictures on the right). 
Though I was spared from embarrassment, I was still left with those foam balls (and paint).  Then, came my “aha” moment.  Since it’s the end of the school term, I could make something for the teachers!  

Here's how I made the crepe paper rose bouquet:
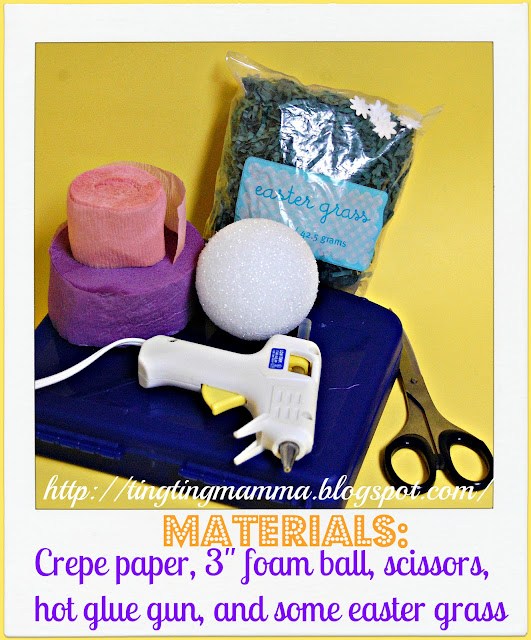
For the vessel, use a porcelain flower pot or a mug.  Be sure to try out for size ahead of time.
Note: For photo shooting purposes, I used purple crepe paper for this tutorial.
1. Cut a 30" long crepe paper.
2. Fold the crepe paper lengthwise down about 1".  As you fold,       stretch the paper gently. 
3. To begin rolling the rose, fold width wise 1/4" twice or three times.
4. Start rolling as you pinch the bottom of the rose along.
5. (top view)
6. Roll and roll and roll...until you come to the end of the paper.
7. (bottom view) don't worry about the uneven bottom.  It will be trimmed later.
8. Add a dab of hot glue to secure the paper end.
9. Trim the bottom of the rose off so it's flat.
10. Apply LOTS of hot glue at the bottom of rose.
11. Attach the rose to your foam ball.  Press firmly with your palm.
12. This is what it looks like from the side.  

I made 17 pink roses for my bouquet.  Then, I hot glued the Easter grass to fill the space right under the bottom row of roses.  Hot glued the finished foam ball to a flower pot or a mug.  
Happy crafting!

While I was busy with the paper roses, JJ came up with her own crepe paper creation as well.  =)


deb signature Follow TingTingMamMa

Tuesday, June 5, 2012

Understanding God's Word


Today's Bible memory verse is from 1 Corinthians 1:18: 
"For the message of the cross is foolishness to those who are perishing, but to us who are being saved it is the power of God."

I asked JJ if she understood the verse.  She answered me: "Only a part of it."  She said, "People who do not love and believe God are perishing."  

Then I asked Z the same question.  He said, "The Word of God means nothing to those who choose not to believe."  

Praise the Lord that He gave each child the ability to internalize His word.  I continue to pray that Z, F and JJ will grow in complete knowledge and understanding of the message of the cross as it is the power of God to them.

deb signature Follow TingTingMamMa

Saturday, June 2, 2012

JJ Dance Picture

JJ took her tap dance pictures this morning.  When we arrived at the dance studio, I saw many young girls all dressed up with complete make up.  I mean they had on red lipsticks, rough, eye shadows, and mascaras.  For one second, I thought I was at one of the junior beauty pageants.  And for one second, I thought JJ’s figures looked washed out amongst her peers and regretted not putting anything on JJ’s face.  But when I turned to look at her little face, I knew I would not want to take away that innocent look by covering it up. 
I took some pictures of her outside the studio and embraced her beauty created by God. 


deb signature Follow TingTingMamMa

Friday, June 1, 2012

JJ's Paper Lantern

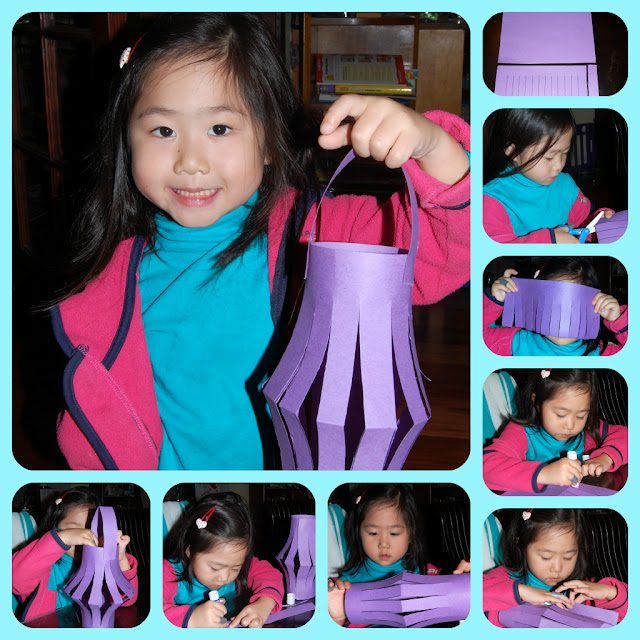
     JJ loves to craft.  Unfortunately, I do not always have time to sit down with her, especially in the evening when I need to prep for dinner.  This is one of the crafts JJ could manage herself.  She would spend extra time to decorate her lanterns by drawing on them or put stickers/sequins/glitters on them.  Once she made a "lantern family" with different size and different color papers.  By the time she's done, I am most likely done with my prep in the kitchen, too, and could join her lantern party. =)

    Here's how JJ does it: (follow pictures from top right)

    1.    Fold the construction paper in half lengthwise.
   2.   Cut a 1” wide strip as the handle.  Set it aside for later.
   3.   With the remaining paper, start from the fold, draw lines           1”-1½” apart, leaving 3-4” inches of space on top.
   4.   Cut those lines.
   5.    Open it up and glue the two long sides together.   
   6.   Glue the handle to the 2 sides of the top of the lantern.
   7.   Smile for the camera!


deb signature Follow TingTingMamMa

LinkWithin

Related Posts Plugin for WordPress, Blogger...
Follow TingTingMamMa